ColdFront: Setting Up Every Supported Storage Backend
PostgreSQL is great at handling hot, frequently accessed data, but keeping years of historical data in PostgreSQL is expensive. Disk fills up, queries slow down, and vacuum overhead grows.
ColdFront solves this by automatically tiering old PostgreSQL partitions to Apache Iceberg on any S3-compatible object store. A transparent view keeps the data queryable from PostgreSQL. Your application never needs to change a query.
This post walks through setting up ColdFront with every supported storage backend: SeaweedFS (local S3 for dev/test), AWS S3, Google Cloud Storage (GCS), and Azure Blob Storage (ADLS Gen2). By the end, cold data is being archived automatically and both hot and cold rows come back from a single SELECT.
System Architecture
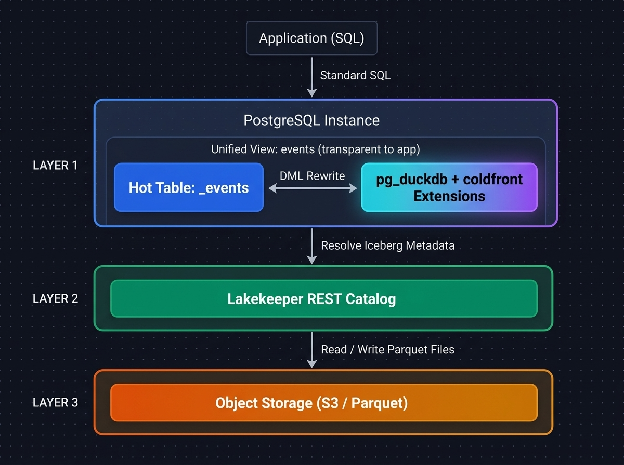
The following diagram illustrates how the database, extension stack, Lakekeeper REST catalog, and object storage coordinate to support transparent hot/cold querying:
 How ColdFront Works
ColdFront has two binaries:
archivertiers expired PostgreSQL partitions to Iceberg on cold storage, then replaces the partition with a transparent view that unions hot (PostgreSQL) and cold (Iceberg) data.partitionermanages partition lifecycle for tables that do not need cold tiering: premakes future partitions and drops partitions past the retention period.
The cold tier sits on Lakekeeper, an Iceberg REST catalog that tracks table metadata and Parquet file locations. DuckDB (via the pg_duckdb extension) handles the actual Iceberg reads and writes inside PostgreSQL, without an external pipeline or ETL job.
Prerequisites
A Rocky Linux 9/10 (or compatible) VM ARM64 or AMD64
Docker + Docker Compose
Credentials for your chosen storage backend
Step 1: Install Docker
ColdFront’s development stack runs entirely in Docker, so the first thing you need is Docker Engine and the Compose plugin. The commands below work on Rocky Linux 9/10 on both AMD64 and ARM64:
sudo dnf -y install dnf-plugins-core
sudo dnf config-manager --add-repo https://download.docker.com/linux/rhel/docker-ce.repo
sudo dnf -y install docker-ce docker-ce-cli containerd.io docker-buildx-plugin docker-compose-plugin

# Start and enable Docker
sudo systemctl enable --now docker

# Add your user to the docker group (no sudo needed after re-login)
sudo usermod -aG docker $USER
newgrp docker
Step 2: Clone the Repository
Clone the project repository and move into it. All subsequent commands run from the repo root:
git clone https://github.com/pgEdge/ColdFront
cd ColdFront
ARM64 only:
Pre-built base images for both AMD64 and ARM64 are published to GitHub Container Registry and pull automatically when the stack starts. If you need to build the base image yourself (e.g. for a custom PostgreSQL major version or to apply local patches), run:
docker buildx build \
  --platform linux/arm64 \
  --build-arg TARGETARCH=arm64 \
  --build-arg PG_MAJOR=18 \
  --no-cache \
  -f docker/Dockerfile.duckdb15-base \
  -t ghcr.io/pgedge/coldfront-duckdb-base:pg18 \
  --load .
This produces a base image (~1.3 GB) containing PostgreSQL 18, pg_duckdb, and the pre-loaded Iceberg DuckDB extension. The coldfront extension itself is compiled on top of this base by docker compose --build in Step 3.
Step 3: Start the Stack
ColdFront ships with a Docker Compose stack that includes PostgreSQL 18 (with pg_duckdb and the coldfront extension pre-installed) and Lakekeeper.
For local development (SeaweedFS, no cloud credentials needed):
docker compose --profile local-store up -d --buildFor cloud storage (AWS S3, GCS, or Azure):
docker compose up -d --buildThe first run pulls images and builds the ColdFront container. It can take a few minutes. Once it finishes, check that everything came up:
docker compose psThe expected output (SeaweedFS profile shown; cloud setups will not have the seaweedfs container):
| Container | Status | Purpose |
|---|---|---|
| Running | PostgreSQL 18 with pg_duckdb + coldfront extensions; stores your hot (recent) data |
| Running | PostgreSQL backing Lakekeeper; stores Iceberg catalog metadata (table locations, snapshots) |
| Running | SeaweedFS, a local S3-compatible object store for Iceberg Parquet files (SeaweedFS profile only) |
| Exited (expected) | One-time job that runs Lakekeeper’s database migrations on first start, then exits cleanly |
| Running | Lakekeeper, an Iceberg REST catalog that tracks table metadata and Parquet file locations |
Step 4: Bootstrap Lakekeeper (One-Time)
Lakekeeper requires a one-time bootstrap before it can accept warehouse registrations. This sets the initial administrator credentials and terms agreements:
curl -X POST http://localhost:8181/management/v1/bootstrap \
  -H "Content-Type: application/json" -d '{"accept-terms-of-use":true}'
On success, the bootstrap returns: {}.
If Lakekeeper isn’t ready yet (still starting up), you’ll get a connection refused error. Wait a few seconds and try again.
Step 5: Create a Warehouse
A warehouse tells Lakekeeper where your Iceberg data will live - run the command for your storage backend:
SeaweedFS (Local / Development)
curl -s -X POST http://localhost:8181/management/v1/warehouse -H 'Content-Type: application/json' -d
'{"warehouse-name":"wh","storage-profile":{"type":"s3","bucket":"iceberg","region":"us-east-
1","endpoint":"http://seaweedfs:8333","path-style-access":true,"flavor":"s3-compat","sts-
enabled":false,"remote-signing-enabled":false},"storage-credential":{"type":"s3","credential-
type":"access-key","aws-access-key-id":"admin","aws-secret-access-key":"adminsecret"}}'
AWS S3
curl -X POST http://localhost:8181/management/v1/warehouse   -H "Content-Type: application/json" -d '{
    "warehouse-name": "wh",
    "storage-profile": {
      "type": "s3",
      "bucket": "<your-bucket-name>",
      "region": "ap-south-2",
      "path-style-access": false,
      "flavor": "aws",
      "sts-enabled": false,
      "remote-signing-enabled": false
    },
    "storage-credential": {
      "type": "s3",
      "credential-type": "access-key",
      "aws-access-key-id": "key-id",
      "aws-secret-access-key": "secret-key"
    }
  }'
Google Cloud Storage (GCS)
curl -s "http://localhost:8181/management/v1/warehouse" \
  -X POST -H "Content-Type: application/json" -d '{
    "warehouse-name": "wh",
    "storage-profile": {
      "type": "s3",
      "bucket": "<your-gcs-bucket>",
      "region": "us-east-1",
      "endpoint": "https://storage.googleapis.com",
      "path-style-access": true,
      "flavor": "s3-compat",
      "sts-enabled": false,
      "remote-signing-enabled": false
    },
    "storage-credential": {
      "type": "s3",
      "credential-type": "access-key",
      "aws-access-key-id": "access-key-id",
      "aws-secret-access-key": "secret-access-key"
    }
  }'
Azure Blob Storage (ADLS Gen2)
curl -s "http://localhost:8181/management/v1/warehouse" \
  -X POST -H "Content-Type: application/json" -d '{
    "warehouse-name": "wh",
    "storage-profile": {
      "type": "azdls",
      "filesystem": "<container-name>",
      "account-name": "<storage-account-name>",
      "endpoint": "https://<storage-account-name>.dfs.core.windows.net"
    },
    "storage-credential": {
      "type": "az",
      "credential-type": "shared-access-key",
      "key": "<your-access-key>"
    }
  }'
All four backends return the same JSON on success, with the warehouse ID:
{"warehouse-id":"<uuid>","warehouse-name":"wh"}A 4xx response usually means the bootstrap in Step 4 was skipped or the credentials are wrong.
Step 6: Database Setup
Connect to your running PostgreSQL instance:
docker exec -it coldfront-db-1 psql -U coldfront -d coldfrontEnable the required extensions (both are pre-installed in the container image):
CREATE EXTENSION pg_duckdb;
CREATE EXTENSION coldfront;
Note: The ColdFront image ships with the Iceberg DuckDB extension preloaded. No manual duckdb.install_extension('iceberg') call needed.
Next, create a partitioned table. We’ll add two partitions: one for June 2026 (current month, stays hot in PostgreSQL) and one for April 2026 (two months ago, past the hot window, so the archiver will tier it to cold storage):
CREATE TABLE public.events (
    id     bigint GENERATED ALWAYS AS IDENTITY,
    ts     timestamptz NOT NULL,
    status text,
    data   jsonb,
    PRIMARY KEY (id, ts)
) PARTITION BY RANGE (ts);
CREATE TABLE public.p_2026_06 PARTITION OF public.events
    FOR VALUES FROM ('2026-06-01') TO ('2026-07-01');
CREATE TABLE public.p_2026_04 PARTITION OF public.events
    FOR VALUES FROM ('2026-04-01') TO ('2026-05-01');
INSERT INTO events (ts, status, data) VALUES
  ('2026-04-01 00:00:00+00', 'cold', '{"source": "cold-test"}');
Step 7: Set the Storage Secret
Configure the storage secret in the database. This allows DuckDB inside PostgreSQL to authenticate with your storage. Select your storage backend below:
SeaweedFS Secret
SELECT coldfront.set_storage_secret('admin', 'adminsecret', 'seaweedfs:8333');AWS S3 Secret
Note: The third positional parameter of set_storage_secret is endpoint, not region. When connecting to AWS S3 (which has no custom endpoint), pass null explicitly for that slot so the region lands in the correct position:
SELECT coldfront.set_storage_secret('keyid', 'secretkey', null, 'ap-south-2');GCS Secret
SELECT coldfront.set_storage_secret(
  p_key_id    => '<HMAC-access-key>',
  p_secret    => '<HMAC-secret>',
  p_endpoint  => 'storage.googleapis.com',
  p_region    => 'us-east-1',
  p_url_style => 'path',
  p_use_ssl   => true);
Azure Secret
SELECT coldfront.set_storage_secret_azure(
  'AccountName=<storage-account>;AccountKey=<key>;EndpointSuffix=core.windows.net'
);
When you are done, exit psql:
\qStep 8: Create the Configuration File
Create /tmp/cf.yaml with your editor and paste the content for your storage backend. This file tells the archiver how to connect to PostgreSQL, where your Lakekeeper catalog lives, and how to authenticate with object storage.
Note on hostnames: The lakekeeper_endpoint and S3 endpoint values use Docker-internal hostnames (lakekeeper, seaweedfs). This is correct: the archiver passes these values to DuckDB running inside the PostgreSQL container, which resolves them over the Docker network. The archiver binary itself only connects to PostgreSQL.
SeaweedFS Config
postgres:
  dsn: "host=localhost port=5432 dbname=coldfront user=coldfront password=coldfront sslmode=disable"
iceberg:
  warehouse: "wh"
  lakekeeper_endpoint: "http://lakekeeper:8181/catalog"
s3:
  endpoint: "seaweedfs:8333"
  access_key: "admin"
  secret_key: "adminsecret"
AWS S3 Config
postgres:
  dsn: "host=localhost port=5432 dbname=coldfront user=coldfront password=coldfront sslmode=disable"
iceberg:
  warehouse: "wh"
  lakekeeper_endpoint: "http://lakekeeper:8181/catalog"

s3:
  region: "ap-south-2"
  access_key: "<YOUR_ACCESS_KEY>"
  secret_key: "<YOUR_SECRET_KEY>"
  use_ssl: true
GCS Config
postgres:
  dsn: "host=localhost port=5432 dbname=coldfront user=coldfront password=coldfront sslmode=disable"
iceberg:
  warehouse: "wh"
  lakekeeper_endpoint: "http://lakekeeper:8181/catalog"

s3:
  endpoint: "storage.googleapis.com"
  region: "us-east-1"
  access_key: "<HMAC-access-key-id>"
  secret_key: "<HMAC-secret>"
  use_ssl: true
  url_style: "path"
Azure Config
postgres:
  dsn: "host=localhost port=5432 dbname=coldfront user=coldfront password=coldfront sslmode=disable"
iceberg:
  warehouse: "wh"
  lakekeeper_endpoint: "http://lakekeeper:8181/catalog"

azure:
  connection_string: "AccountName=<storage-account>;AccountKey=<key>;EndpointSuffix=core.windows.net"
Step 9: Build the Binaries
From the repository root, compile the two binaries:
make buildThis produces bin/archiver and bin/partitioner. The archiver handles cold tiering and retention management; the partitioner manages partition lifecycle for tables that don’t need cold tiering.
Step 10: Register and Run the Archiver
These commands run on your host machine. Docker Compose maps PostgreSQL to localhost:5432, so the archiver can connect without entering any container.
First, register your partitioned table with ColdFront. This writes a configuration row to coldfront.partition_config that tells the archiver which table to manage, how long to keep data hot, and how long to retain it in cold storage:
./bin/archiver register --config /tmp/cf.yaml --table events --period monthly \
    --hot-period "1 month" --retention "5 years"
Now run the archiver. It will scan the table’s partitions, find any that are past the hot window, and tier them to Iceberg:
./bin/archiver --config /tmp/cf.yamlExecution logs:
2026/06/11 13:12:33 loaded 1 table(s) from coldfront.partition_config
2026/06/11 13:12:33 [events] auto-detected partition column: ts
2026/06/11 13:12:33 [events] starting archive cycle
2026/06/11 13:12:33 [events] found 1 partition(s) past the hot window
2026/06/11 13:12:33 [events] exporting p_2026_04 (2026-04-01 00:00:00 +0000 UTC to 2026-05-01 00:00:00 +0000 UTC)
2026/06/11 13:12:33 [events] p_2026_04 phase 0 (idempotent iceberg-range wipe): 9ms
2026/06/11 13:12:33 [events] p_2026_04 phase 1 (install capture trigger + delta table): 3ms
2026/06/11 13:12:33 [events] p_2026_04 phase 2 (bulk export PG→Iceberg under snapshot): 77ms
2026/06/11 13:12:33 [events] p_2026_04 phase 3 attempt 1 (delta replay): 3ms
2026/06/11 13:12:33 [events] p_2026_04 phase 4 attempt 1 (cutover: lock + watermark + view + DETACH): 2ms
2026/06/11 13:12:33 [events] p_2026_04 phase 5 (cleanup: drain stragglers + drop partition + trigger + delta): 3ms
2026/06/11 13:12:33 archived p_2026_04
2026/06/11 13:12:33 [events] expired cold rows older than 2021-06-12 13:12:33Z
2026/06/11 13:12:33 [events] archive cycle complete
Archiver Pipeline Execution Flow

The April partition has now been removed from PostgreSQL and successfully written to Apache Iceberg format in your object store.
Step 11: Verify Hot and Cold Data
Once the archive process completes, queries against the events table return both local PostgreSQL rows and remote Iceberg rows:
-- Both hot + cold rows are queryable via the unified events view
SELECT * FROM events;
 id |           ts           | status |          data
----+------------------------+--------+-------------------------
  1 | 2026-04-01 00:00:00+00 | cold   | {"source": "cold-test"}
(1 row)
The April row comes back even though its partition no longer exists in PostgreSQL. It’s being read live from Iceberg.
Check the hot/cold boundary configuration:
SELECT * FROM coldfront.archive_watermark;
 table_name |      cutoff_time
------------+------------------------
 events     | 2026-05-01 00:00:00+00
(1 row)
Any data older than the cutoff is served from Iceberg; newer data is served from PostgreSQL.
Verify that the Parquet file was written to object storage. ice is the attached catalog alias ColdFront configures for Iceberg reads:
NOTICE:  result: Success
BOOLEAN
[ Rows: 0]
                 (×3 — emitted by ensure_attached)

 ensure_attached
-----------------

(1 row)

                              file_path                              | file_format
--------------------------------------------------------------------+-------------
 s3://iceberg/<uuid>/data/<uuid>.parquet                            | PARQUET
(1 row)
Now insert a current-timestamp row (this goes into PostgreSQL, not Iceberg) and confirm that a single query returns both tiers:
INSERT INTO events (ts, status, data) VALUES
  (now(), 'hot', '{"source": "hot-test"}');
-- Unified view: returns both the hot PostgreSQL row and the cold Iceberg row
SELECT * FROM events;
 id |              ts               | status |          data
----+-------------------------------+--------+-------------------------
  2 | 2026-06-11 13:18:29.835761+00 | hot    | {"source": "hot-test"}
  1 | 2026-04-01 00:00:00+00        | cold   | {"source": "cold-test"}
(2 rows)
You can also query the hot table directly to confirm the cold row is no longer stored locally:
-- Hot table: returns only the PostgreSQL row
SELECT * FROM _events;
 id |              ts               | status |          data
----+-------------------------------+--------+------------------------
  2 | 2026-06-11 13:18:29.835761+00 | hot    | {"source": "hot-test"}
(1 row)
Bonus: Standalone Partitioner
If a table only needs partition lifecycle management (retention purging and pre-allocation of future partitions) without archiving to cold storage, you can run the partitioner binary alone.
Step 1: Create a partitioned table:
CREATE TABLE orders (
    id         bigint GENERATED ALWAYS AS IDENTITY,
    created_at timestamptz NOT NULL,
    customer   text,
    amount     numeric(10,2),
    PRIMARY KEY (id, created_at)
) PARTITION BY RANGE (created_at);
CREATE TABLE orders_2026_06 PARTITION OF orders
    FOR VALUES FROM ('2026-06-01') TO ('2026-07-01');
Step 2: Create the config file:
Save the following to /tmp/part.yaml:
postgres:
  dsn: "host=localhost port=5432 dbname=coldfront user=coldfront password=coldfront sslmode=disable"
archiver:
  tables:
    - source_table: orders
      partition_column: created_at
      partition_period: monthly
      retention_period: 12 months
Step 3: Register the table with the partitioner:
./bin/partitioner register --config /tmp/part.yaml --table orders --period monthly --retention "12 months"
registered public.orders
Step 4: Verify the registration:
./bin/partitioner list --config /tmp/part.yaml
TABLE          PERIOD   HOT  RETENTION  MODE            SHAPE  EXPIRY  ENABLED
public.orders  monthly  -    1 year     partition-only  flat   drop    true
Step 5: Run the reconciliation process:
./bin/partitioner --config /tmp/part.yaml
2026/06/29 13:37:55 loaded 1 table(s) from coldfront.partition_config
2026/06/29 13:37:55 [orders] reconciled (premake 3, retention 1 year)
Step 6: Confirm the generated partitions:
SELECT inhrelid::regclass AS partition
FROM pg_inherits
WHERE inhparent = 'orders'::regclass
ORDER BY partition;
    partition
------------------
 orders_2026_06
 orders_p_2026_07
 orders_p_2026_08
 orders_p_2026_09
The Current Partitioning State:
After the initial setup and the first reconcile pass, the table contains a manual seed partition (orders_2026_06) and three automated forward partitions (orders_p_2026_07 through orders_p_2026_09).
Each reconcile pass:
Premakes the next 3 monthly partitions ahead of
now.Ensures a partition covering
todayexists so inserts never fail.Drops any partition older than the retention period (1 year). Data is permanently deleted, so lower
retention_periodwith care.
Bonus: Running the Compactor
The archiver does its job well, but every time it tiers a partition, it writes a fresh batch of Parquet files to Iceberg. Do this often enough and you end up with dozens of small files sitting in object storage. Reads start pulling from all of them in parallel and things slow down. The compactor fixes this by quietly merging those small files into fewer, larger ones. Nothing changes in your data, it just gets tidier.
Step 1:Build the compactor:
The compactor is a separate binary from the archiver. Build it with:
make compactorThis produces a bin/compactor executable.
Step 2: Run it:
It uses the same config file as the archiver, so there is nothing new to configure. Just point it at the table you want to compact:
./bin/compactor --config /tmp/cf.yaml --table eventsStep 3: Check the Execution logs:
compactor: public.events — 3 group(s), 12 small files -> ~3 (48 MiB in)
compactor: public.events — compacted: 12 files -> 3 (48 MiB -> 46 MiB)
If nothing needs compacting yet, it exits cleanly:
compactor: public.events — nothing to compact (3 files scanned, none below target)Step 4: Put it on a schedule:
Add the compactor to the same cron schedule as the archiver. The two work well together: the archiver tiers the data, the compactor keeps it clean. If you also want to free up storage by removing old snapshots, pass --expire-snapshots:
./bin/compactor --config /tmp/cf.yaml --table events --expire-snapshotsSummary
We set up ColdFront against four storage backends: SeaweedFS, AWS S3, GCS, and ADLS Gen2. Same result each time: old partitions leave PostgreSQL, land in Iceberg Parquet files, and a SELECT on the original table still returns everything.
No application changes. The transparent view replaces the partition in place. Your queries, ORM, and reporting tools see the same table name they always did.
One binary, four backends. The archiver and partitioner don’t care which object store you use. SeaweedFS for local dev, S3 in production, GCS or ADLS Gen2 if that’s what your infrastructure runs on. The only difference is the credential block in the config file and the warehouse registration curl.
Retention is separate from tiering. The hot window controls when a partition moves to cold storage. The retention period controls when cold data is deleted. You can keep data in Iceberg indefinitely or expire it on a schedule, independent of the tiering step.
The partitioner runs standalone. For tables that don’t need cold tiering, run the partitioner binary on its own to handle pre-allocation and retention. No Iceberg or Lakekeeper required.
Don't forget the compactor. Every time the archiver tiers a partition, it writes new Parquet files to Iceberg. Run these long enough and you end up with hundreds of small files and queries start slowing down as a result. The compactor fixes this by merging them into fewer, larger files. If the archiver is on a cron schedule, put the compactor on the same one: ./bin/compactor --config /tmp/cf.yaml
The full source is at github.com/pgEdge/ColdFront. Questions and pull requests are welcome.